Stipulations and how to manage them
ThereStipulations are severala productivitymechanism Featuresto withinmanage CreditSnapwhat next steps are needed AFTER data entry is over but before an application becomes eligible for agreements. In other words, Stipulations are the "verifications" an application has to go through before it is ready for agreements and booking. It is a critical part of CreditSnap's automation engine.
For example,
AddA Deposit applicaiton may need KYC / ID Verification before agreements- On the other hand a
reminderPersonalonLoantheautomaitonapplciationmay need Income Verification -> ID Verification before agreements and booking into core AssignAanCreditapplicaitonCardtomayselfonlyorneedsomeoneIncomeelseVerification before electronic acceptance and booking into coreAddAnNotesauto Withdrawloananmayapplicationneed QueueInsuranceManagementDocument LockUploadMarkcopyanuploadSendVerification
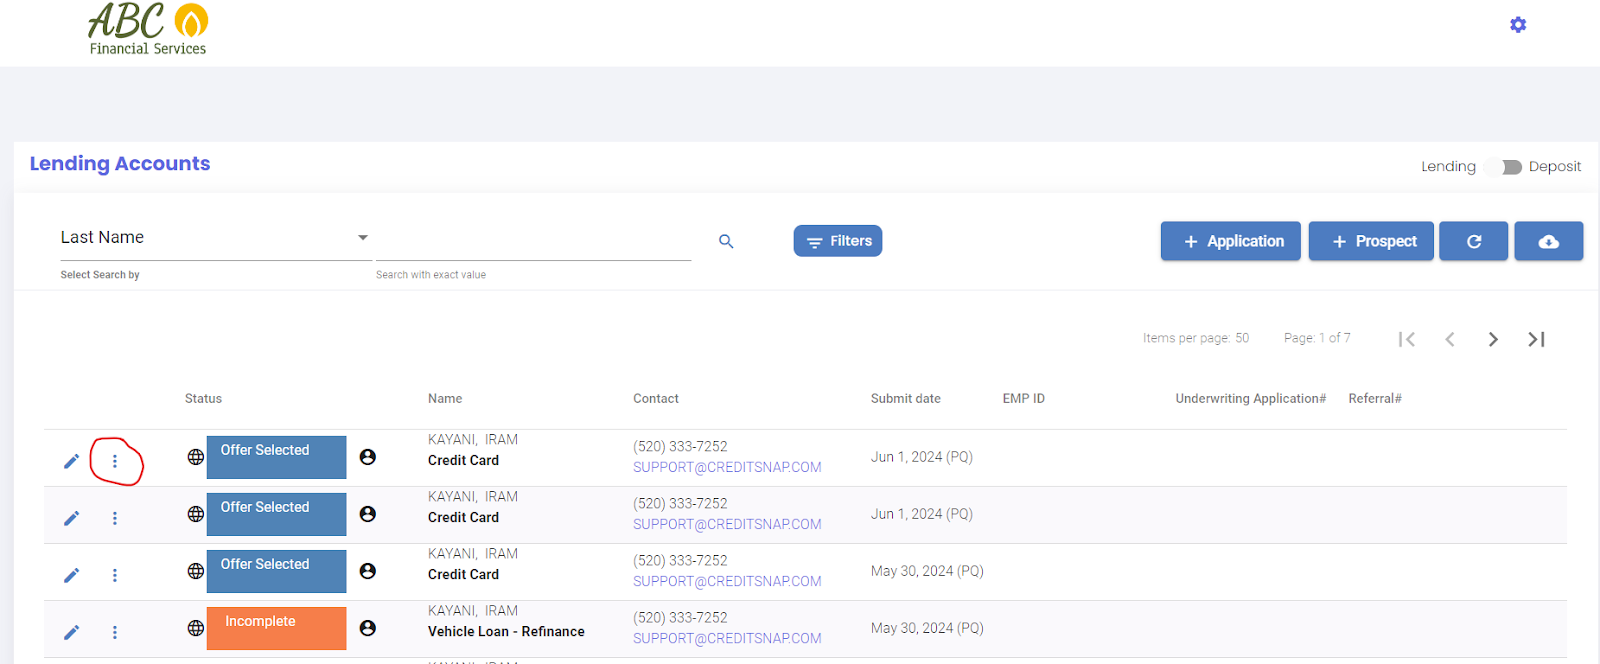
ThroughoutThe thismost article,popular you will find references to "three dots menu"stipulations in the dashboard,CreditSnap andsystem "hamburgerare:
- ID Verification - Automatically reviewed by the
applicationsystem - Income
SeeVerificationscreenshots-belowAutomaticallywhatreviewedthey mean - Document Upload (
see below red circled menu option in the attached image)Reminder CapabilitiesAnytime you call an applicant and the applicant suggests you call back on a certain date, then the employee can add a reminder on that application. When that day arrives, the application will float to the top of your queue with a “bell/reminder” icon on itTo add a reminder, you can use either 1) the "three dots menu" on the dashboardone or2)more)the-hamburgerAlwaysmenuneedonmanualthereview
Reminders or automatic follow-ups with applicants areCreditSnap also built into the system. These reminders go out to applicants that are not making progress - via email and sms. Your marketing team can work with CreditSnap team to activate these, or administer them undersupports "EmailManual &Review" SMSstipulation. Admin"This from the admin options.
Assign an application to self or someone else
CreditSnapstipulation is designed to automategive yourunderwriters applicaitonor workflows.retail ONLYteams whena an applicaiton needsway to bestop updated,automation assignfor thatcertain applicaitontypes toof selfapplications.
Where? someone
IfStipulations noare changesfound needed, then always electunder "No"Stipulations" whentab promptedfor atDeposits, opening an application
You can assign an application to yourselfand inone"CreditofAnalysis"threetabwaysfor-Lending.1)How
the "three dots menu" on the dashboard next to the application (or) 2) the hamburger menu on the application page (or) 3) On edit of an application, if the applicaiton is not assigned to anyone yet, then a prompt will appear asking ifdo youwantmanagetothem?assignthis to yourself. Click "Yes" to assign that applicaiton to yourself.YoucanSomeassignstipulationsanlikeapplicationIDto someone elsein one of two ways - 1) the "three dots menu" on the dashboard next to the application (or) 2) the hamburger menu on the application page.
Add Notes
CreditSnap automatically adds notes at every step of the way. To see the notesVerification and eventIncome trail, edit applicaiton -> Click on "Events" option towards left bottom. In addition to these automatic notes, you may need to add adhoc notes on to the applicaiton after a customer conversation or after applicaiton review.
You can add notes to an applicaiton in one of two ways - 1) the "three dots menu" on the dashboard next to the application (or) 2) the hamburger menu on the application page.
Withdraw an application
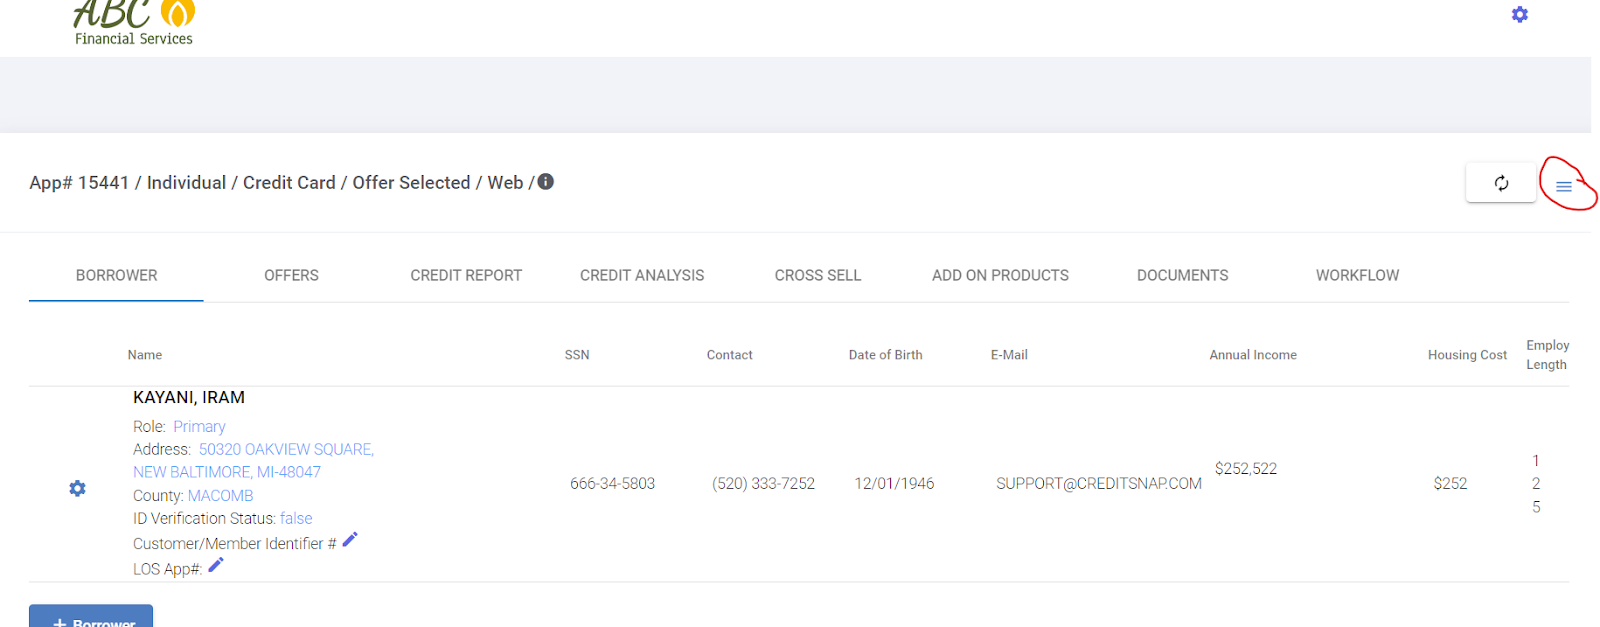
When an applicant decides to not pursue an application further, you can "Withdraw" that applicaiton. To do so, use the hamburger menu on the application page and the Withdraw option there.
Note: When an application already exists for an applicant, and if they try to start another applicaiton of the same category, then the systemVerificaiton will automatically channel them to the previously created applicaiton. If you are trying to allow the applicant to create a new applicaiton, then marking the old applicaiton "Withdrawn" will wllow the applicant ot create another applicaiton of the same category.
Lock an application
When you do not want anyone in your team to acidentally edit anything in an application (may be because you are already having a conversation with the applicant (or) because compliance or someone asked for that applicaiton to be untouched), you can use "Lock" option from the hamburger menu on application page
Note: Some applications - when complete or when funded - can enter into Lock state automatically.
Mark an application Complete
When an application is successfully booked, you can "Mark it Complete" from the hamburger menu on the application. While it is ont necessary to mark an applicaiton complete, some teams prefer to do so so that they know to not worry about them anymore
Send App Online
CreditSnap system is designed to automate the process for your applicants. But every now and then applicaitons need manual review. Once you complete your review, you do not need to send an email or call the cutsomer to let them know. To make it easy for you to make this communcation happen, always use "Send App Online" option from the hamburger menu on the application. Applicant will immediately receive an email and SMS with a deep link that they can use to directly go to the page where they need to continue.
This process is the same for every situation where you want the applicant to resume the application. These emails and sms carry common messaging like "Your applicaiton is ready for next steps" so that the experience of the applicant is standard and easy.
Queue Management
Queues are designed to a) categorize applications into manageable queues and b) to enable notificaiton when an application falls into a queue.
How to create a Queue: Queues can be created or edited from Gear Icon -> Lending Admin or Deposit Admin -> Queue Management. A queue can be created by selectingthe system and most likely "cleared" by the system with an audit trail of how the system automatically cleared them.
Who can be a part of the queue? Once a queue is created, employees can be associatedmoved to that"CLEAR" queue.status
Notifcations: Queue can also enable notificaitons. When creating a queue, an optional "distribution email" can be attached to the queue. When an application falls into that queue, then an email notificaiton will be sent to that distribution email. In other words, you may not assign any employees to a queue, but decide to use queues becase you want to use the email notifications functionality.