Productvity Features
Reminder Capabilities
There are two different reminder capabilities:
- Reminders to members - This can be setup and possibly it is already active. Go to email & SMS option under admin to see if these are already there.
- Reminders to employees - Anytime you call an applicant and the applicant suggests you call back on a certain date, then the employee can add a reminder on that application. When that day arrives, the application will float to the top of your queue with a “bell/reminder” icon on it. Filters - If your goal is to see any apps that failed ID Verificaiton or did not sign the docs or did not complete Income verification, then simply use the Queue filter at top left to see just those applications.Reminder Capabilities
What are the different Application Statuses

The icons in the status column will give you a clear idea of what stage and status a particular application is in. Each icon shows that stage a particular application is at and what status of that stage is:
- [Insert Image] - Core Onboarding
- [Insert Image] - KYC/Id-Verification
- [Insert Image] - E-Signatures
- [Insert Image] - Account Funding
- [Insert Image] - OFAC / Qualifile
The colors of the above logos dictate their current statuses:
GREY - Not Started
BLACK - Started
RED - Failed
Green - Complete Successfully
High-level Deposit dashboard level features
Application Dashboard
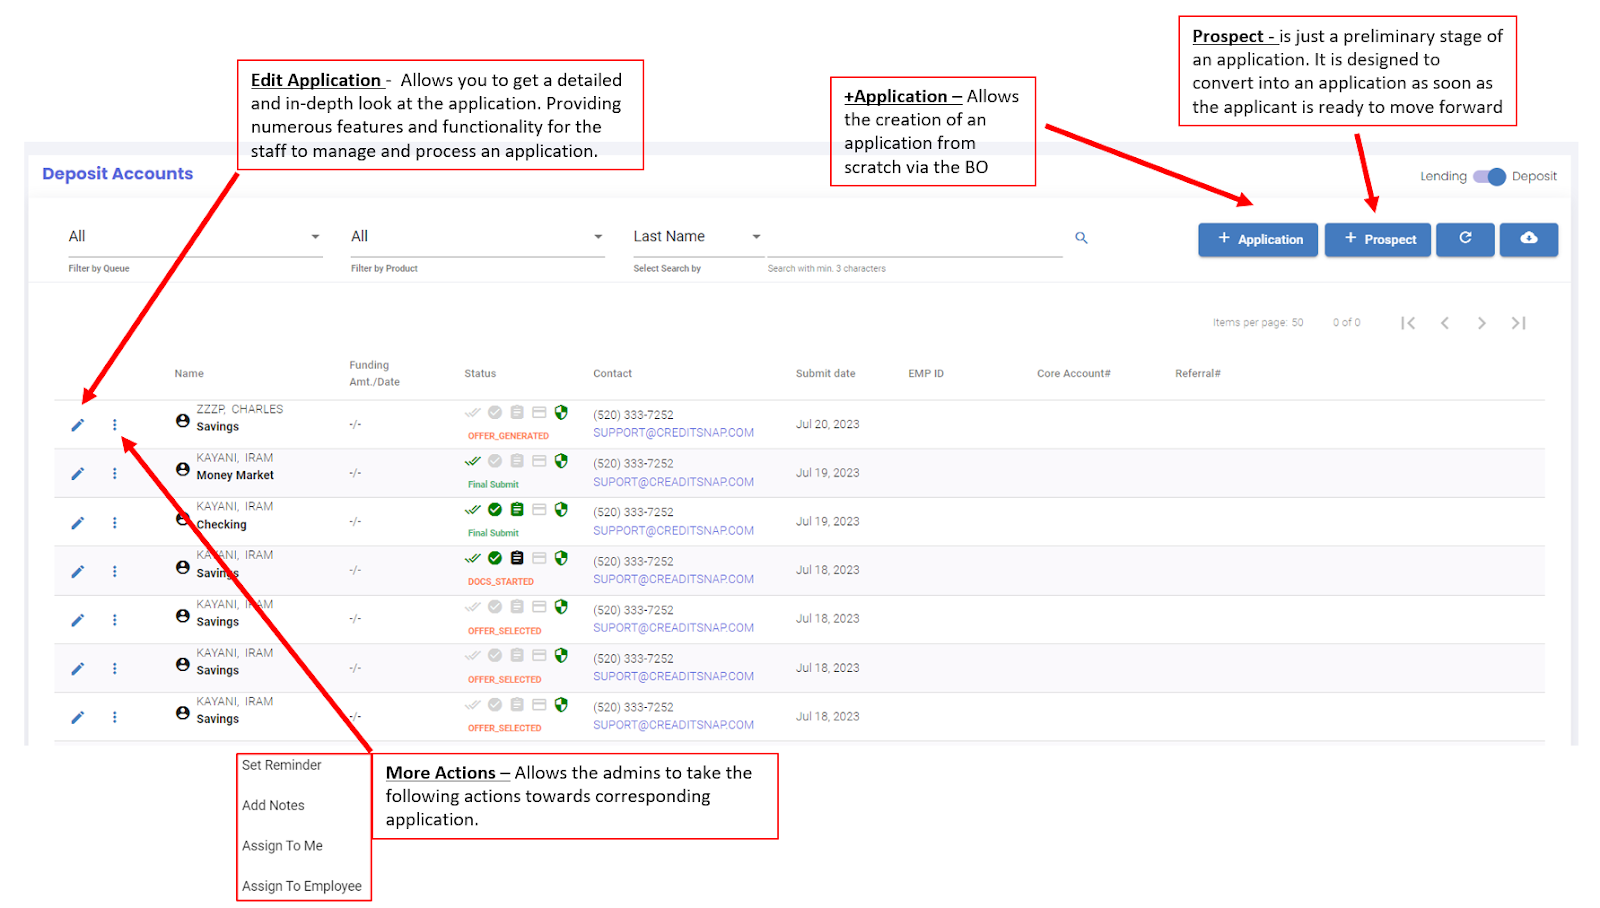
Once you click on the Edit Application icon (Pencil Icon) on the far left of each application - you will be taken inside an individual application. Here you will get a complete in depth look at this application. As the application dashboard is in depth and loaded with features we will break it down into multiple steps based on individual tabs you will see there.
Please note that this breakdown is what is applicable for 90% of all CreditSnap features and some features may or may not apply to your institution. The CreditSnap team is happy to help if you don't see something that applies to your institution
Applicant Tab
The Applicant tab as the name suggests gives us a full idea of the borrower information collected through the customer facing UX.
- Top Half
- On the top you will see the status of Application number, Type of App (Individual/Joint), type of account the user came into the funnel looking for status of the application and channel
- All the the other Tabs the user can toggle to
- Basic KYC information along with the current status this application is on followed by Member/Account # (these will be populated directly from core after the Core if there is a core integration)
- Bottom Half
- Provides insights into other feature information where applicable such as:
- Member Eligibility
- Additional Information
- Address History
- Mailing Address
- References
- Event History - Event history maintains a complete event by event history of all the actions taken on this application both by the customer and the staff handling this application
- Consent History - All the consent the customer has agreed or disagreed to while starting the application
- Provides insights into other feature information where applicable such as:
Terms Tab
This tab displays the account types the customer has already selected.
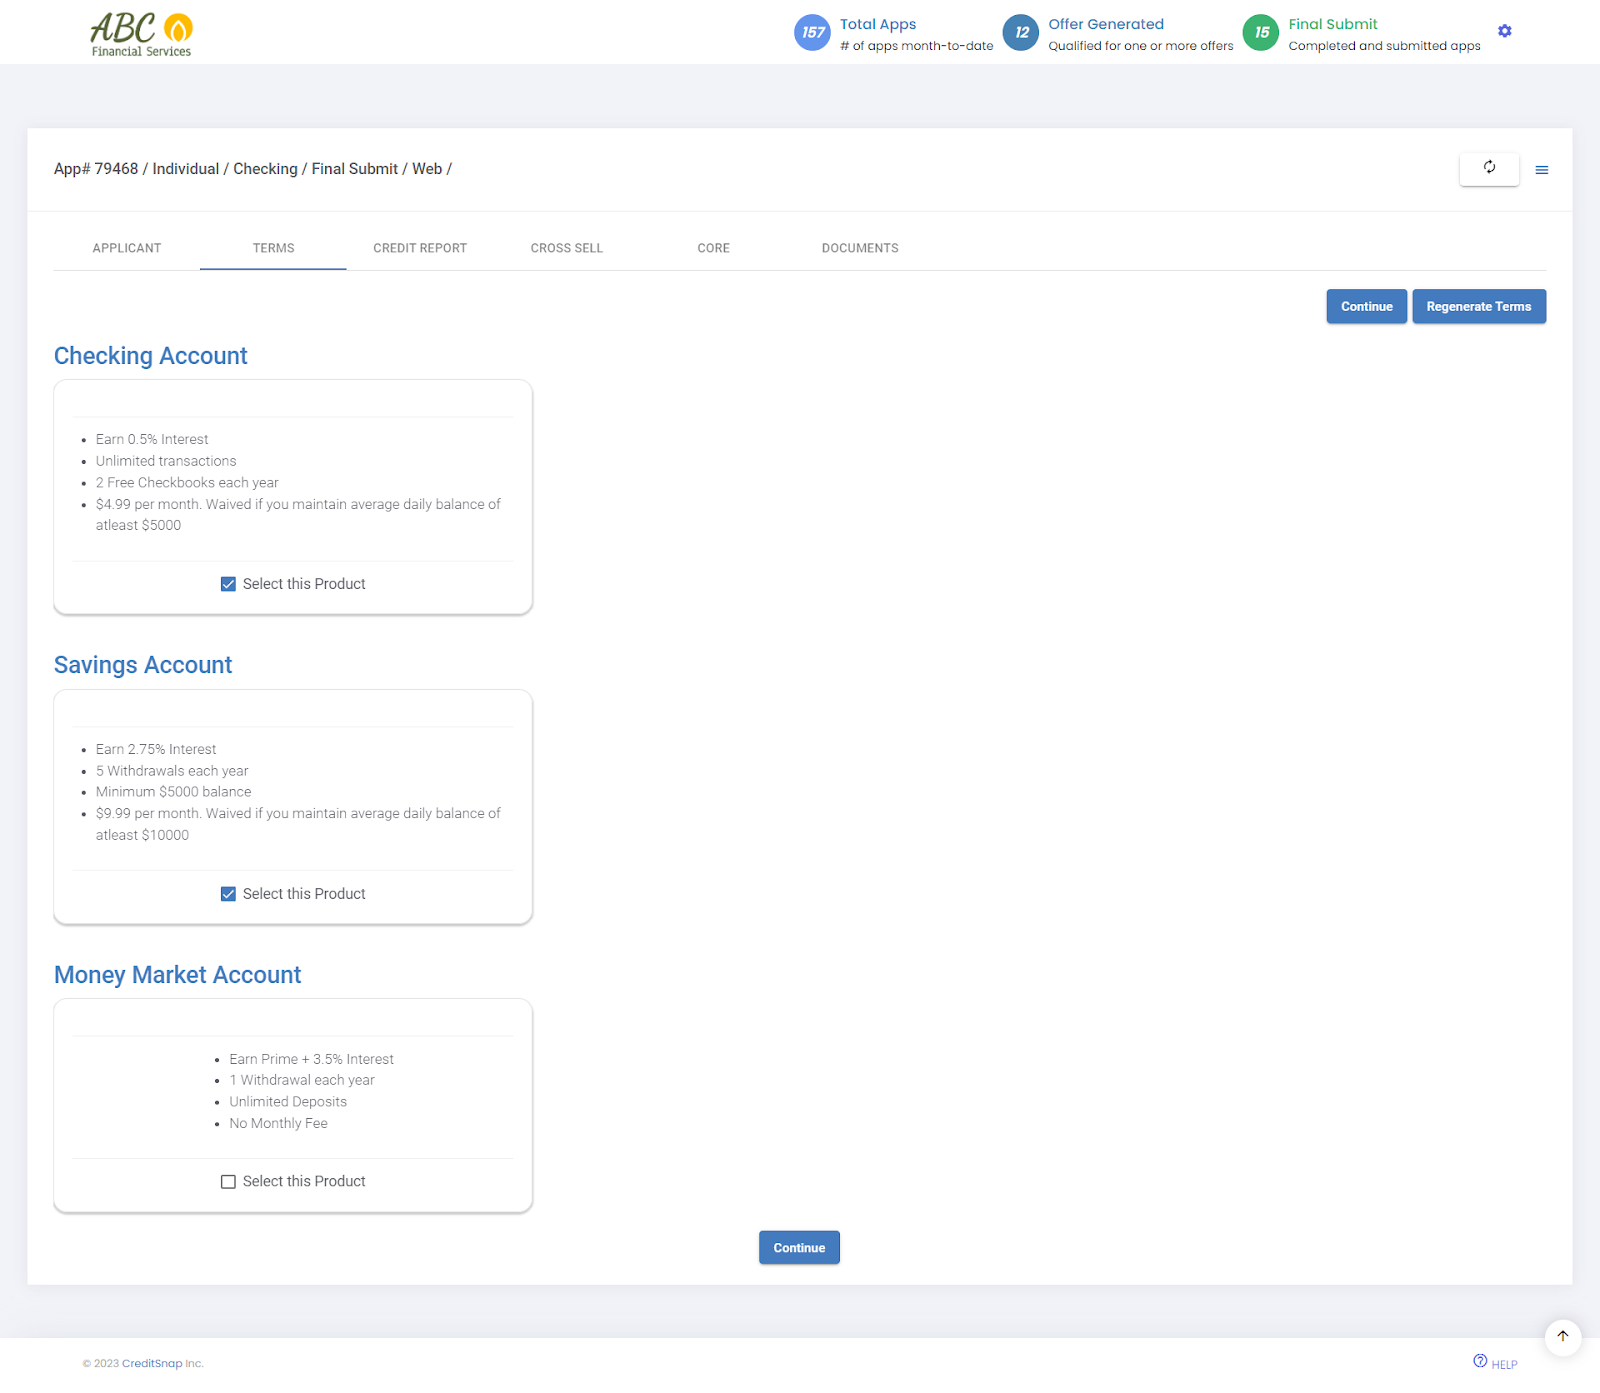
What is the Regenerate Terms Button?
The regenerate terms button enables you to regenerate the terms presented to the customer. This is usually applicable when you are creating an application from the back office or when you need to regenerate the terms in scenarios when a new type of account has been added after the application has already been created. When you regenerate terms you will be shown the following popup:
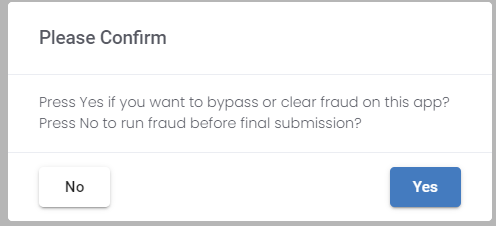
It is advised to never bypass fraud checks other than in special scenarios at the staffs discretion.
Credit Report Tab
This is where you will go if you want to understand how the credit ratios are working or examine what exactly the credit profile of this customer is.
If it is an individual application, which is a single applicant application you will just see one primary tab and the credit report for the primary. In case there is a co-borrower, you will see a co-borrower tab right next to primary which can also be examined by clicking on it.
Let us draw our attention to the ratios presented at the top of the tab screen. Please note: These ratios are at the loan level not the primary or co-borrower level. This is because we take the trade lines from both primary and co-borrower add them up to, to arrive at the joint ratios. So that's why these ratios are at an application level and not at a primary or a co-borrower level. These ratios are structured as:
Credit summary
This section gives us a 10,000 foot view of what this borrower's credit profile looks like.The score is a great indication of the underlying credit behavior. It could be a FICO score, a VantageScore, FICO Score 8 or whatever score your institution uses will show up here. This section also provides information on all the trades ,open trades, installment trades and revolving trades.
Collections
This section indicates upfront if there is any adverse behavior that you should know of.
Judgments
Indicates if there are any judgements on record that you should know about.
Fraud Alerts
This section will appear if there are any SSN or date of birth mismatches. If you are subscribed to any fraud warning/alerts from your bureau they will appear here. Please note that this section is only visible if there is a fraud alert on the profile of the applicant(s).
Trade Lines
The trade lines are split into Open Trades and Closed Trades.
Each loan is a trade line of its own and you can see original terms and the remaining term along with the term and rate. When you look at all this information you usually get a pretty good perspective on things like - was there a term extension, what is the remaining term, what's the remaining balance and current monthly payment this borrower is making on this particular installment loan, and then you come to payment status.
Inquiries
You can see the list of inquiries on this credit report presented here.
If you want to see the raw credit report itself, we give you that option. Simply click on the Full Credit Report button at the bottom of the screen.
Cross Sell Tab
The cross sell tab comes into play when you also have the lending platform and cross sells setup with CreditSnap. This tab will display the cross sell offers for loans the user has selected if they do so. It will remain blank if no selections are made. Your staff can engage the customer and make a selection for the customer. After which you will be able to create a loan application in a few clicks.
Core Tab
When to use Push to Core?
The core tab allows you to manually push the application to core using the push to core button and is applicable in the below scenarios:
- In scenarios where the user completes ID verification successfully but the Core information is not populated on the applicant tab
- In scenarios where ID verification has failed but the staff is able to verify that the ID is legitimate, either by checking the Id verification report in the documents tab or by reviewing an ID manually.
You will be asked to confirm that Id verification status has been verified before taking this action.
Documents Tab
This tab presents a large amount of details and comes with a lot of functionality.
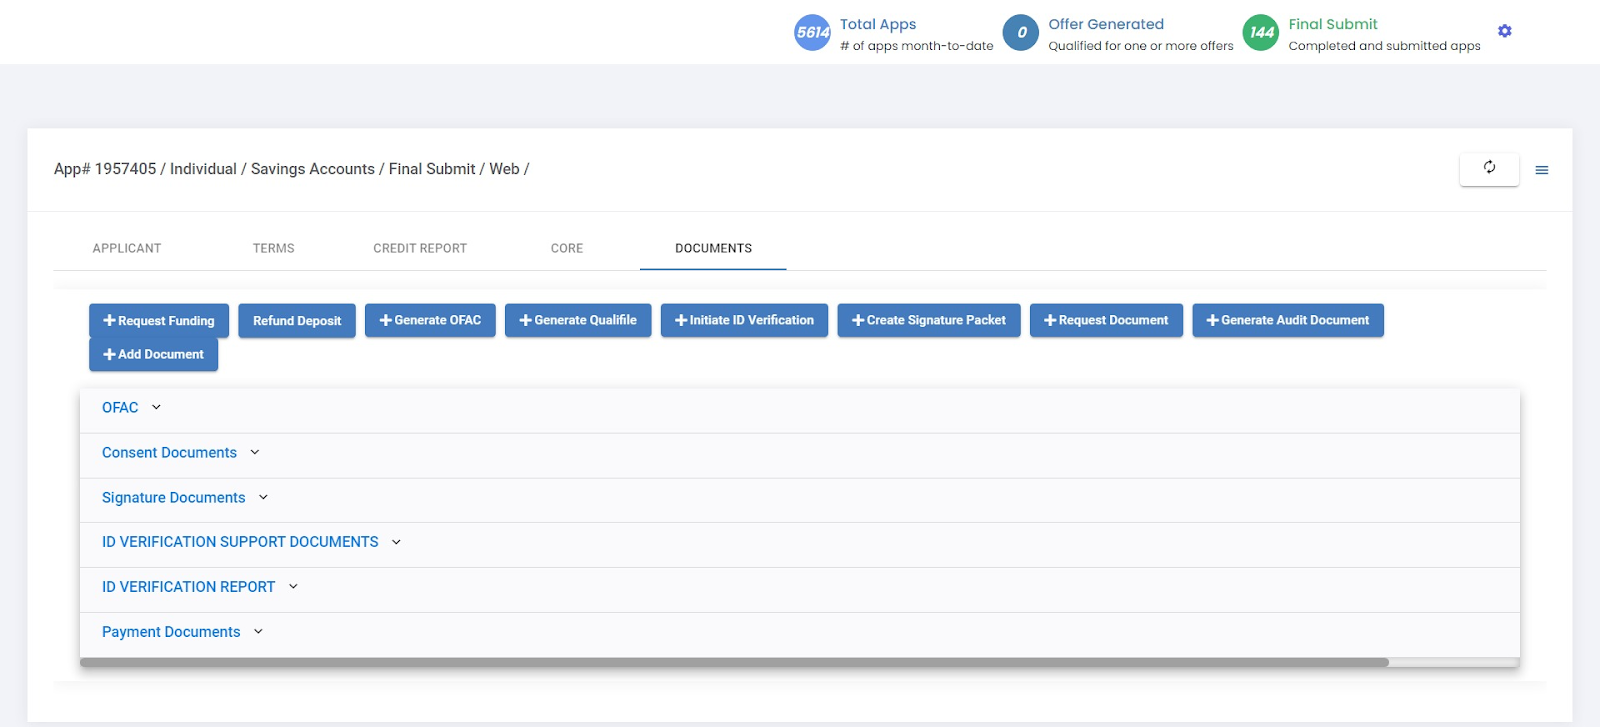
In this tab we have a complete record of all the reports returned from our integrations as well as consent documents etc, such as:
- OFAC Report
- Other Fraud Reports where applicable - (example Chexsystems)
- Consent Documents - Keeps a record of all the consents provided by the customer at the final submit stage, including IP address and timestamps
- Signature Documents - Record of the signed documents when the signatures are complete or the documents that are sent out and pending signatures
- ID Verification Support Documents - Detailed report of the decision on ID verification along with support material provided for id verification (example DL, passport, state Id etc.)
- ID Verification Report - Here you will find the consolidated CDD report of the ID verification
- Payment Documents - Payment information when funding is complete
Manual Intervention Scenarios/Features in Account Opening BO
Though the happy path is the customer seamlessly moving through all the stages of the application on their own there are scenarios where you will need to intervene and take some manual steps to get the application to the finish line depending on what stage a particular application is on.
To reiterate this is the order of the application flow in 90% of the cases (If your case is different please reach out to the CreditSnap team for help) :
- Customer Completes Application and Provides Consents
- Completes KYC/ID-Verification to Successfully be generate Member related credentials from Core
- Signs E-signatures for Account Opening Docs
- Funds the account
Let us break down the manual Intervention actions for each of the above stages of the application:
Manual Action Buttons On Documents Tab
- +Request Funding - Use to send “Resume Application” links to fund the account. Should only be used after esignatures are complete
- Refund Deposit - Allows you to refund already funded application
- +Generate OFAC - Manually generates OFAC
- +Generate Qualifile - Manually generates Qualifile report if applicable for your Institution
- +Initiate ID Verification - Use to send “Resume Application” links to the Applicant
- +Create Signature Packet - Allows you to manually select and send esginature documents to the customer. IMPORTANT: After selecting the required documents and clicking “Request eSignature”, expand the “Signature Documents'' tab that you just created. Here you can view
- the signature package by clicking “View”, once you are satisfied please click “Send for E-Signature” to deliver the signature package to the customer to sign.
- +Request Document - You can request support documents by using this button. The requirement of what these support documents are should be shared with the CS team to configure in advance. You can raise a helpdesk ticket for this if you want to do so now.
- +Generate Audit Document - Creates a pdf with all the user information along with a history of all the events in this application
- +Add Document - You can upload documents to the application by choosing this button
What do do when an application is submitted but ID verification is not completed?
Verify the status of the application on the Applicant tab - If it is on Verification Started status the user may not have completed the IDV steps on their mobile device. If it is in Verification Failed status check the ID Verification Support Documents and ID Verification Report sections on the Documents tab to see why they have failed.
In both of the above scenarios you can click on the +Initiate ID Verification Button to send out links to the customer to complete IDV.
In cases where IDV has failed but you are comfortable approving the ID manually either on reviewing the IDV support documents or by other methods - You can Push to Core from the Core tab - this will generate and deliver core data to the application
What to do when the customer has not received the e-signature package?
In cases where the applicant has not received the e-sign package to sign after completing IDV successfully and or where you may need to resend them. There are two methods to deliver them
- If an app is already on the ACCOUNT_SUBMITTED or DOCS_STARTED Status - Use the Hamburger menu on the top right of the dashboard (
) and in the dropdown select “Send App Online” This will trigger documents of signatures and in the same flow will direct the customer to fund the account subsequently.
- Click the +Create Signature Packet button on the Documents tab and select the applicable documents you wish to deliver for signature. This will create a Signature Documents package which will be delivered directly by docusign and any subsequent steps to complete the application will need to be triggered from the Bo.
CreditSnap tracking overview:
CS has two tracking parameters - referralCode (to be used at campaign level) and subID (to be used at lead level). Both are optional. For web traffic, these can be passed as URL parameters. For API channel, these can be passed as a part of the API payload
ReferralCode Overview:
- when referralCode passed in the URL as url parameter, then referralCode parameter will be populated with the param value
- In the absence of these variables, system will then look for utm_source, utm_medium and utm_campaign params, and whatever there will be captured and appended together into referralCode (like in the screenshot)
subID Overview:
- When subID passed in the URL as url parameter, then subID parameter will be populated with the param value